copilot-explorer
Copilot-Explorer
This is a tool meant for exploring the codebase of Github Copilot (the client side, not the model itself).
It’s work in progress. See the Journal for details on what’s been done so far and my observations.
There’s a blog post that explains the high level findings, and provides necessary code pointers.
Screenshots
Just show me the tool
You can access a version of the tool here.
This explores version 1.57.7193 of the VSCode extension of Copilot.
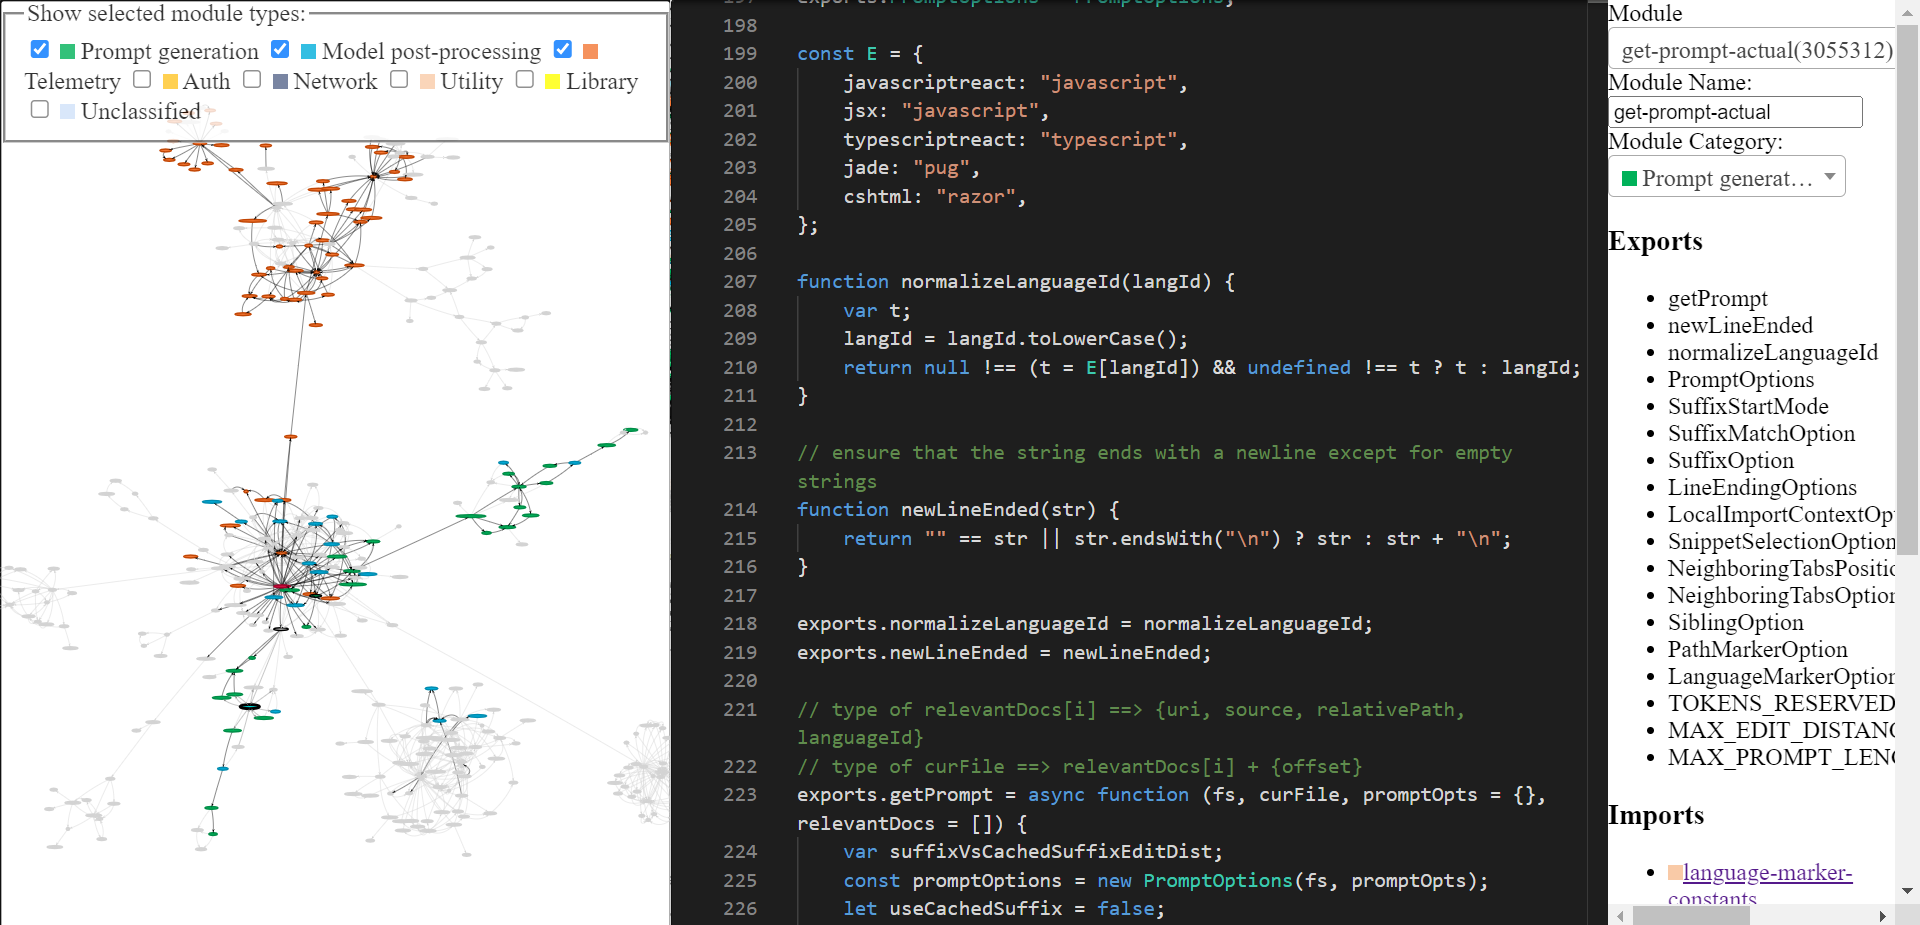
The webpage shows 3 panels:
- Left most shows the module-level dependency graph of the extension. The edges are based on imports.
- Middle panel shows the prettified code of the selected module. By default the main module is selected.
- Right panel shows some information about the model (specifically, the module id, exports, imports and modules that import this module).
Module Names: I’ve also named modules – some of them manually, while most of them were automatically named using codex in a few-shot manner. Some names are not unique, and I’ve not dealt with that. IDs of every module are unique though.
Module Categories: I’ve similarly also categorized modules automatically (again using codex and a bit of manual labeling). The categories are not perfect, but they serve as a very good guideline for segregating modules.
Manual annotations: Some of the modules were quite interesting, so I manually annotated them (added comments and renamed variables) to make them easier to understand. These are now directly viewable in the middle panel. Links below.
If you want to start browsing, below are some interesting starting points.
Navigation tips:
- You can use the forward and back buttons to navigate through the history of modules you’ve visited.
- Within a module, use your regular VSCode shortcuts (e.g., ctrl+click will work for definitions within the same file). They don’t work across modules. But I’ve renamed the modules to make them easier to navigate. So, e.g., in module A, if you see
M_prompt_extractor.getPrompt(), then you know to look forprompt-extractormodule in the right panel. - The modules have been color coded so you can choose to ignore the modules you don’t care about.
Interesting modules
Some interesting modules I’ve found so far (these notes were written before I wrote the blog post, so some comments might be outdated):
- Prompting:
- This is the most interesting part of the codebase to me. This is what brings all the smarts to Copilot apart from the model itself. The reason copilot can get function names right often is because of this stuff.
- The following modules have been manually annotated and constitute most of all the magic:
- 4969: prompt-extractor.js – the entry point module
- 3055312: get-prompt-actual.js – this has the core logic for prompt extraction
- 3055670: sibling-function-fetcher.js – this has the logic for extracting sibling functions
- 3055456: prompt-choices-and-wishlist.js – this has the logic for extracting prompt choices and wishlist
- 3055125: neighbor-snippet-selector.js – this has the logic for extracting neighbor snippets
- 3055179: imports-and-docs-extractor.js (didn’t really annotate but looks simple enough and only implemented for typescript)
- For many languages, copilot calls the tree-sitter parser via WASM. There are some wrappers around that in 464.
- Note that there are some duplicate modules, idk why but I’m guessing webpack does something. So many modules starting with 3055… will have copies with other ids.
- Completion:
There appear to be two main workflows for completion:
- Inline-Completions (the stuff you most commonly use, where copilot autocompletes as you type).
- 3197 appears to be the main module for this. This is imported by the main module and it registers an inline-completion-provider. The
class vthere is actually the InlineCompletionItemProvider. - 9334 appears to be the module that contains the core logic for inline completion. It defines
getGhostText.. Depends on lots of other copilot modules. Only two hops away from the main module. The core functionality appears to the following:- Use cached suggestions if available
- If user is typing, provide suggestions that match the typed text
- Make network call if necessary, while waiting for debouncing period to pass
- Take care of cases where user is “cycling” through choices specially. Didn’t pay much attention here.
- A lot of recording of telemetry data
- 2218 is a simple helper module that seems relevant too
- 3197 appears to be the main module for this. This is imported by the main module and it registers an inline-completion-provider. The
- Panel Completion (the stuff shown if you press ctrl+enter)
- 2388 seems to contain the main logic for this.
- I’ve manually added some comments and renamed some variables to make it easier to understand. You can see the modified code here.
- 893 seems like a wrapper over 2388
- 2990 is the main copilot-panel module. This is imported by the main module. You can see this contains the “Accept Solution” and “Replace code with this solution” buttons.
- 2388 seems to contain the main logic for this.
- Inline-Completions (the stuff you most commonly use, where copilot autocompletes as you type).
- Telemetry:
- 7017 seems to track changes after accept/reject of suggestions.
- The most interesting thing to me here was that they measure the effectiveness of the insertion at 5 points – 15s/30s/2min/5min/10min after the suggestion was accepted. For rejection, they only capture after 30s (other timestamps are ignored).
- At these timestamps, they measure how much of the suggestion was still present in a window around the insertion point.
- The above is quantified in terms of edit-distance (at character level and at token-level. A token is most likely just stuff separated by spaces or something like that. Details can be found in 5120)
- Haven’t fully understood the details of the measurement. Will need to play around a bit more to understand this.
- Also, at the 30s timestamp, the telemetry calls “captureCode” (regardless of whether the suggestion was accepted or rejected). Here they basically look at the insertion point, extract the prompt that’d be used to make a suggestion at this insertion point (idk why they re-extract instead of caching it), and also extract stuff after the insertion point till some length they compute. Haven’t yet understood till where they look after the insertion point.
- 6333 appears to be the main Telemetry code
- 7017 seems to track changes after accept/reject of suggestions.
- Network:
- Misc:
- Config/Experiments:
- Copilot has some variables that are controlled via A/B tests I think. I haven’t fully explored this stuff yet, but I do plan to.
- The main module for this is 9189. Take a look at the “Features” class.
How to run locally
If you want to play with the code (different transformations, different visualizations, etc.), you can run the tool locally and modify the code.
- Clone the repo
- Run
npm install - Run
node index.js– this processes the copilot extension code and produces modules by doing some automatic reverse engineering.
Steps 2 and 3 are optional. They’re only needed if you modify the extension code or the transformation code. The repo already contains the processed modules.
- Install manifest using
pip install manifest-ml. - Create a file named
codeviz/.openai-api-keystoring your OpenAI API key. You can keep this empty if you’re not going to predict names and categories, or going to use theselect-snippet -> right-click -> Describe this snippetfeature (which doesn’t work that well anyway). - Run
python3 codeviz/app.pyto start the app. - Head to
localhost:5000in your browser.
Manual annotations
The tool supports 3 types of annotations: (a) module names (b) module categories (c) module code.
You can change the first two annotations (rename/recategorize modules) by the UI. These annotations persist in your localstorage. If you want to export them, you can use browser console to do so. I know this isn’t ideal, but hey this is a hacky repo. I doubt anyone will reannotate stuff seriously.
For module code – if you find a particular module interesting and want to add your comments, you can do that and save the annotated module under codeviz/data/manually_annotated_modules/<module_id>.js. Finally, run codeviz/compress_annotated_codes.js which takes all the annotated modules and puts them in a single file that’s loaded in the browser…so that your annotations show up in the UI.
Support and Warranty
lmao
But seriously, this is all on a best-effort basis, I might’ve misunderstood a few things and so the conclusions might be slightly off. If you find something, do raise an issue or a PR.